How do I add or remove trusted locations in Office?
A trusted location in Office can be used to bypass the stricter security imposed by the Trust Center feature of Microsoft Office. This scrutiny is important for documents, spreadsheets, or presentations that you might get from email attachments or websites. For those documents that you have created, come from trusted sources, or contain legitimate macros, you can add a file path as a trusted location for the convenience of bypassing the Trust Center and Office's Protected View.
A trusted location should be used wisely as it will documents in that location to run macros. Malicious documents can use macros to load malware including ransomware. For this reason, your downloads folder would be a bad location to add. Your departmental share on a file server might be a good location to add.
Office on Windows:
- Open Word, Excel, or PowerPoint.
- Choose to create a new blank file.
- Click the File tab.
- Choose Options.
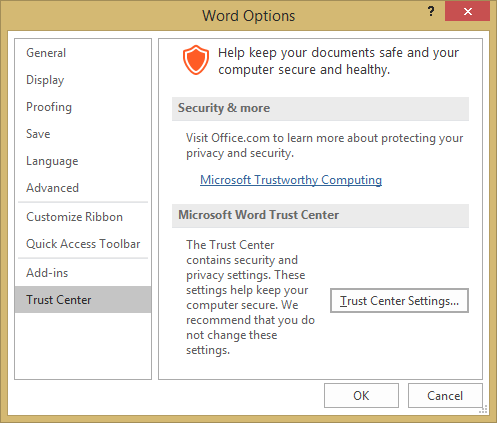
- From the Word Options window, choose Trust Center from the left navigation.
- Click the 'Trust Center Settings...' button.
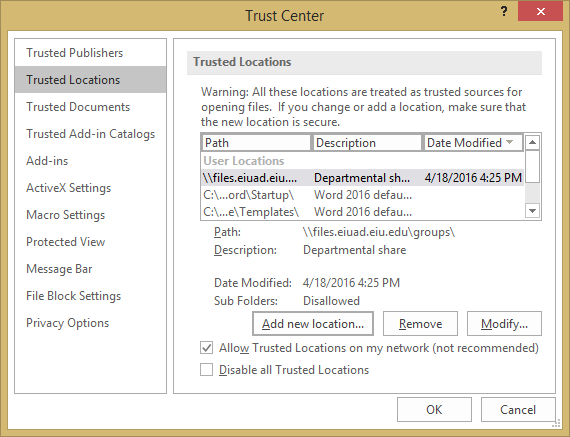
- From the Trusted Center window, choose the Trusted Locations from the left navigation.
- From here, you can add a new location, remove, or modify existing entries using the respective buttons.

You will have to check the box to 'Allow Trusted Locations on my network (not recommended)' in order to add a location like your departmental share.

Office on Mac:
Office 2016 for Mac does not currently have configurable Trusted Locations. By default, you will be warned when a document with macros is opened and this setting should remain enabled. Mac users, just like Windows users, should exercise caution when opening attachments or files from the Internet.
