How do I take a screenshot on my computer?
A screenshot is an image of a computer desktop that can be saved as a picture so it can easily be sent to another person. This is important if there in a error message that needs to be passed along or to simply show someone what is appearing on your desktop.
It is not recommended to paste the screenshot into an email or a Word document because it may reduce the size or quality of the image making it unreadable.
Windows Users:
Using the snipping tool
- Open Snipping Tool by clicking the Start button. In the search box, type Snipping Tool, and then, clickSnipping Tool.
- Click the arrow next to the New button, select which type of snip you would like to use from the list, and then select the area of your screen that you want to capture.
- After you capture a snip, click the Save Snip button in the new window.
- In the Save As window, enter a name for the snip, choose a save location, and then click Save.
Using Print Screen
Press the Print Screen button typically located in the upper right-hand corner of your keyboard to capture a screenshot of your entire display or you may press Alt + Print Screen to capture a screenshot of just the active window.
Once one of these above methods are completed, you will need to open an image editor and save the screenshot as a .jpg or .png
To do this using Paint:
- Open Paint
- Click the Paste button
- Crop the screenshot to the size needed
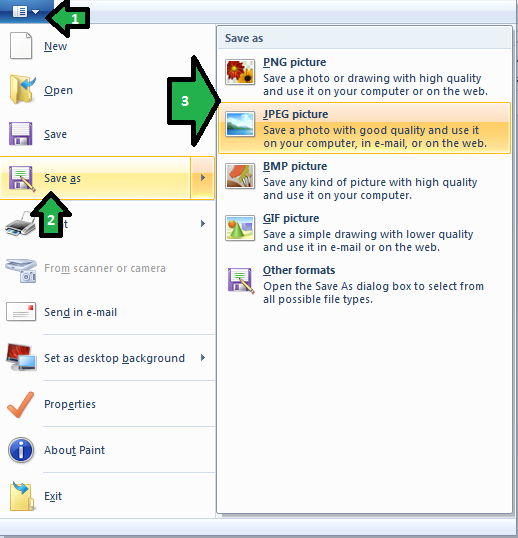
- To save, click the blue button on the left hand side, Select Save As, then Select either PNG picture or JPEG picture.

For Windows 8 or Windows 10 users, you can click the Windows Key and Print Screen to automatically save a full-screen screenshot in the Screenshots folder located in your picture directory.
For Mac Users:
For Mac users, Screenshots are automatically saved as a .png on your desktop.
To capture a screenshot of your entire display:
- Press Command (⌘)-Shift-3
- You will then find the screenshot is saved as a .png file on your desktop.
To capture a screenshot of a certain item,
- Press Command (⌘)-Shift-4. The cursor changes to a crosshair cursor.
- Move the curser to where you would like to start the screenshot.
- Drag to select an area. While dragging the cursor, you can hold the Shift key, Space bar, or Option Key to change how the screenshot selection moves.
